Mastering Christmas Borders: A Practical Guide to Seamless Vector Design
The holiday season brings a surge in creative projects, from personalized gift tags and winter greeting cards to sophisticated packaging designs for small businesses. At the heart of many of these designs lies a crucial element: the border. While it might seem like a simple decorative frame, choosing and applying Christmas borders correctly can significantly impact the professional quality of your final output. Many creators, whether seasoned professionals or enthusiastic beginners, often overlook the technical nuances of vector assets, leading to pixelated edges, inconsistent patterns, or hours of wasted editing time.
Understanding how to leverage high-quality resources, such as hand-drawn Christmas doodle seamless borders, is essential for efficient workflow. These assets are not just static images; they are dynamic tools that, when used correctly, offer unparalleled flexibility. This guide explores common pitfalls in selecting and using these design elements and provides actionable advice to ensure your winter backgrounds and decorative frames look polished and professional.
The Misconception of Static Images vs. Dynamic Brushes
One of the most frequent mistakes designers make is treating border elements as static JPEGs or PNGs. When you download a standard image file, you are locked into a specific resolution and shape. If you need to wrap that border around a circular gift tag or stretch it across a wide banner, the image often distorts, stretches unnaturally, or loses clarity. This is where the power of AI pattern brushes comes into play.
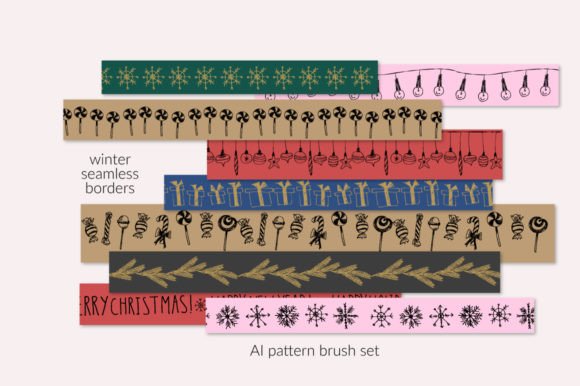
A superior approach involves using vector-based brush sets, such as those containing 32 seamless borders with doodle drawings of Christmas ornaments, lights, snowflakes, branches, cones, and snowmen. These are not merely pictures; they are functional brushes saved within the panel of an EPS10 file. By applying these brushes to any path—whether it is a straight line, a wave, a curve, or a round corner shape—you maintain perfect vector quality at any size. This distinction is critical for entrepreneurs and marketers who need to scale designs from small business cards to large packaging boxes without compromising sharpness.
Overlooking Editability and Color Constraints
Another common oversight occurs during the customization phase. Many users receive black-and-white doodle borders and immediately attempt to change the color after expanding the appearance. This is a technical error that can lead to fragmented paths and difficult editing processes. The correct workflow is to adjust the stroke color before you perform the expand operation.
When you apply a brush to a path in Adobe Illustrator, it remains editable. You can change the color, adjust the size, and modify other brush options instantly. For instance, if you are designing a elegant gold-foil effect for a luxury gift tag, you should set the stroke to your desired gold hue while the object is still a live path. Only once you are satisfied with the visual result should you expand the appearance to convert the brush stroke into editable vector shapes. Failing to follow this order often results in extra cleanup work, as the expanded group may contain unnecessary clipping masks or complex anchor points that were harder to manage if the color was applied post-expansion.
Ignoring the "Stretch to Fit" Nuance
Creating frames is a popular use case for these borders, yet many designers struggle with corners. A typical mistake is manually rotating individual corner pieces, which rarely aligns perfectly with the side borders, resulting in visible gaps or overlapping lines. The "Stretch to Fit" option in brush settings is designed to solve this, but it is often misunderstood.
For rectangular frames, the stretch-to-fit feature usually works seamlessly, adjusting the pattern density to ensure the corners meet precisely. However, for irregular shapes or circles, you may need to tweak the scaling options. It is advisable to experiment with the brush options panel to find the balance between maintaining the integrity of the doodle drawings (like snowmen or pine cones) and ensuring the pattern flows continuously around the shape. If the elements look too compressed or too sparse, adjust the spacing and scaling settings rather than forcing the path to fit. This attention to detail ensures that your winter backgrounds and ribbons look cohesive and intentionally designed.
Neglecting File Organization and Preview Samples
When you download a comprehensive set of 32 seamless borders, the file structure can be intimidating. A frequent point of confusion arises from the sample art included in the EPS file. Many users mistakenly believe they must edit or delete these samples before starting their work. In reality, the objects on the art board are strictly for preview purposes. They demonstrate how the brushes look when applied to various paths.
To use the brushes effectively, open the AI or EPS file and navigate to Menu > Window > Brushes. Here, you will find the entire library ready for use. You do not need to interact with the preview samples on the canvas. Instead, create your own path using the pen tool, rectangle tool, or ellipse tool. With your new path selected, simply click on the desired brush in the panel. This method keeps your workspace clean and prevents accidental modification of the master assets. Furthermore, saving these brushes to your personal library allows you to access them in future projects, enhancing long-term efficiency for freelancers and hobbyists alike.
Choosing the Right Style for Your Audience
Not all Christmas borders are created equal, and selecting the wrong style can miscommunicate your brand’s tone. Hand-drawn doodles evoke warmth, nostalgia, and a personal touch, making them ideal for boutique packaging, handmade gift tags, and family-oriented holiday cards. Conversely, rigid, geometric borders might suit corporate communications better. Before downloading or purchasing, consider the emotional response you wish to elicit.
Additionally, verify the technical specifications. Ensure the file is indeed EPS10 or a compatible vector format if you require scalability. Check for a JPG preview to quickly assess the style without opening heavy vector files. Look for variety in the elements—does the set include diverse motifs like lights, branches, and snowflakes? A diverse set allows you to mix and match or select specific borders that complement your existing design palette, rather than forcing a single repetitive pattern onto every project.
Final Checks Before Implementation
Before finalizing your design, take a moment to review the application of the border. Zoom in to check for any unintended gaps or overlaps, especially at the corners of frames. Ensure that the line weight is consistent with the rest of your design elements. If the border feels too dominant, reduce the stroke width or lower the opacity slightly to let the central content shine. Remember, the border should enhance the message, not overpower it.
By avoiding these common mistakes and leveraging the full potential of vector brush tools, you can elevate your holiday designs. Whether you are creating a simple label or a complex winter background, understanding the mechanics of seamless borders empowers you to produce high-quality, professional results efficiently. Take the time to learn the tools, respect the workflow, and choose assets that align with your creative vision, ensuring your Christmas projects stand out for all the right reasons.